Steps to Verify SSM CTC Certificate
01 PRE-REQUISITES
User need to download both Pos Digicert root certificate and intermediate certificate. ( Both certificates can be downloaded from Pos Digicert’s website. )Steps to Download Pos Digicert Root and Intermediate Certificates

Step 2
Search at POS DIGICERT CLASS 2 ROOT CA G2 section, click at these two certificates to download to your local machine.
- PosDigicert Class 2 Root CA G2 – This is the root certificate used for Org Certificate
- PosDigicert Document Signing - This is the intermediate certificate used for Org Certificate

Step 3
Save those digital certificates to your preferred location at your computer.
Note: The screen may be different depending on end user’s choice of browser.

02 STEPS TO IMPORT DIGITAL CERTIFICATE INTO ADOBE READER / ACROBAT OR WINDOWS
You can import the digital certificates to your trusted identity list to be used for signature validation.Steps to Download Pos Digicert Root and Intermediate Certificates
IMPORT DIGITAL CERTIFICATE INTO ADOBE READER / ACROBAT
Step 1
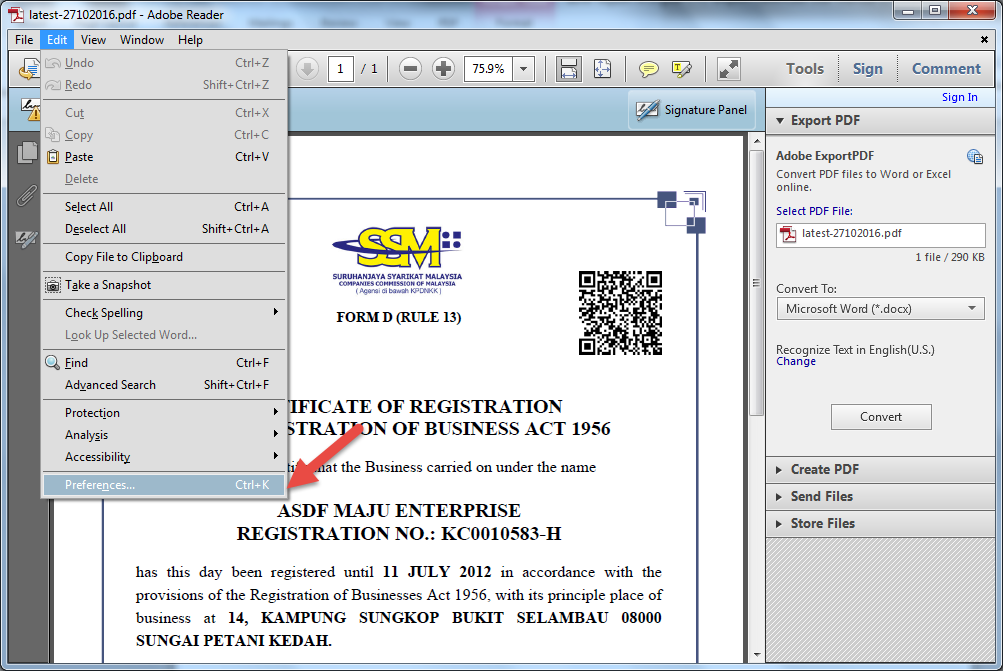
Open Adobe Reader/ Acrobat application, then go to the Preferences dialog box ( Edit > Preferences ).

Step 2
Under Categories, select " Signatures " . To view Identities & Trusted Certificates, click " More ".

Step 3
Select Trusted Certificates on the left. (Digital IDs > Trusted Certificates ). To import the previously downloaded root and intermediate certificates, click Import.

Step 4
Browse for the certificates that you have downloaded earlier. Refer 2.1 Pre-requisites.

Step 5
Click on each of the contact. It will display the certificate associated with the current selected contact on Certificate section below. Then click Trust.

Step 6
Please make sure you tick on the ‘Use this certificate as a trusted root’. Then click OK.

Step 7
Repeat step 6 and 7 for the other certificate.
Step 8
Once done, click Import.

Step 9
Click OK at the Import status pop-up message. The imported Pos Digicert’s root and intermediate certificate will be displayed at the Trusted Certificates.


IMPORT DIGITAL CERTIFICATE INTO WINDOWS
ROOT CERTIFICATE
Step 1
Double click root certificate file to install. Click at Install Certificate.

Step 2
Click Next

Step 3
Browse certificate store

Step 4
Select certificate store ‘Trusted Root Certificate Authorities’

Step 5
Click Next

Step 6
Click Finish

INTERMEDIATE CERTIFICATE
Step 1
Double click root certificate file to install. Click at Install Certificate.

Step 2
Click Next

Step 3
Browse

Step 4
Select certificate store

Step 5
Next

Step 6
Click Finish

CONFIGURE ADOBE READER TO TRUST CERTIFICATE INSTALLED IN WINDOWS
Step 1
Open adobe reader. Go to menu Edit > Preferences

Step 2
In signatures categories > Verification > More

Step 3
Under Windows Integration, please tick 2 boxes - Validating Signatures and Validating Certified Documents and then Click OK

STEP 1:
To view the signature status ( untrusted certificate )
- Open your Signature Panel. ( left hand side of your pdf document )
- Right click on the Signature name
- Select "Show Signature Properties..." from the list
- If the screen shows the statement as per item 4 ( "The signature includes an embedded timestamp but it could not verified." ).Please continue to STEP 2: To configure the Adobe Reader’s signer trust setting

STEP 2:
To configure the Adobe Reader’s signer trust setting
- At the Signature Properties screen,
Click on the "Advanced Properties..." button

- At the Advanced Signature Properties screen,
Click on the "Show Certificate..." button

- At the Certificate Viewer screen,
Click on the "Trust" tab - Click on the "Add to Trusted Certificate..." button
- Then, a message box will appear.
Click on the "OK" button

- At the Import Contact Setting screen,
Please tick the "Certified documents" item and all component under Certified documents - Click on the "OK" button.
Now, close all the screens which are open and proceed to the next step

STEP 3:
To view the trusted signature status
- Open your Signature Panel. ( left hand side of your pdf document )
- Right click on the Signature name
- Select "Show Signature Properties..." from the list

- Statement should appear as per screen 4
( The signature includes an embedded timestamp. Timestamp:... ) - If statement still appear as per screen 5,
( The signature includes an embedded timestamp but it could not verified.)
Click on the "Validate Signature" button - Now you should be able to see the Trusted Time Stamp used
